


With the constant pressure put on your Mustang Nozzle, operators need to check the state of the various parts of the nozzle to ensure it performs at its peak for each job, no matter the difficulty. In this article we will take you through the basic steps to ensure you can carry out maintenance checks simply and effectively on your nozzle.
To begin with, you’ll need a range of essential tools to assist you in carrying out your maintenance check.
- Bench vice or clamp
- Hammer
- Shifter
- Punch
- Small length of wire
- Nozzle tip cleaner

Once you have everything on-hand, you’ll be ready to go.
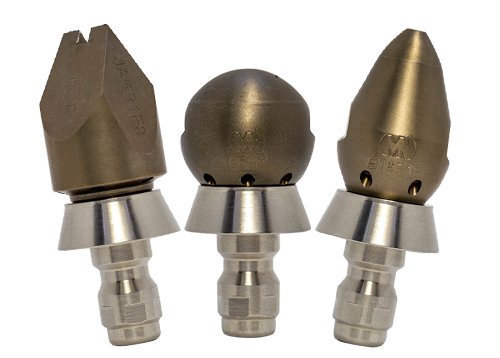
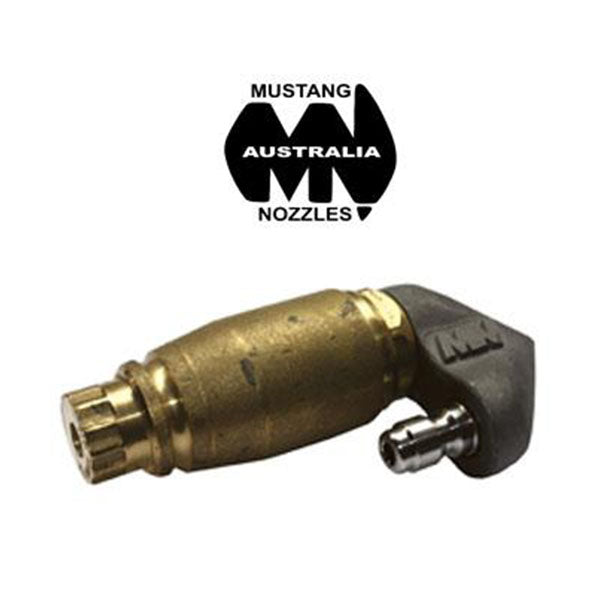
First, we’ll need to take the nozzle apart to access the moving spindle inside, so secure your nozzle, in this case, a JetEx, in the vice and use your shifter to carefully undo the top of the nozzle and remove it from its base.


The spindle sits loose inside the nozzle casing, so carefully turn the nozzle upside down and slide out the spindle. There are generally two types of spindles: an O-ring and a rotating spinner; the other will have a stationary middle section. There is no real difference in operation, just in design.


Our first check will be the ceramic section sitting inside the nozzle casing at the tip. Under good clear light, you want to ensure that the ceramic end-piece does not have any chips or cracks that may weaken its integrity.


TIP: A complete check of the ceramic end-piece can be done by using a small punch tool to remove it from the casing. Gently place the punch inside the nozzle opening and lightly tap to loosen the ceramic endpiece. It should easily drop into your hand. Once out, you can inspect closely for chips and cracks. At this point, you can also check the O-ring for any nicks or deterioration and replace it if necessary.


Next, you want to check the ceramic tip on the spindle for chips or cracks. Because the spindle sits loosely inside the nozzle casing, this tip may be damaged whenever you drop your nozzle or if it takes any big knocks during use.

If you notice any chips, cracks, or heavy wear on ceramic pieces, don't hesitate to contact The Jetters Edge on (02) 9986 1186 to order a replacement part.
Still looking at the spindle, it’s time to check the many holes for any particle debris that may be present. At the back of the spindle, you will see several holes that may contain sand or other particles that affect your nozzle’s performance. To effectively clear this debris, use a small piece of metal wire inserted from the other end of the spindle and push any debris out of the nozzle and not into the nozzle. This will ensure you are not pushing any debris back into the spindle and causing further damage.

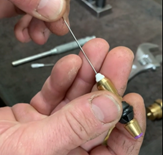

Once you have pushed debris out of the spindle, use a short, sharp blow into the spindle to clear any final loose particles. Hold it up to a bright light and make a visual inspection of a debris-free spindle. Repeat the last step until all loose material has been removed.

Now we move on to checking the jets on your nozzle. The number of jets your nozzle has will vary depending on the model. You can check your nozzle jets by checking the product on our website. Use your Nozzle Tip Cleaner and gently insert it into each jet opening and remove any debris that may have built up inside each jet opening. Don’t forget; some Mustang Nozzles will have both forward and rear jets, check both.

You will also want to check the inlet hole for any obstructions. Located on the nozzle base that is screwed into the casing, this is the entry point for the water, so it must be clean and clear.

Next, we will check the ceramic tip of the nozzle casing and ensure the opening is clear. As you know, water will always seek the ‘path of least resistance. It’s essential that the nozzle tip is clear and unobstructed to allow the water jet to be most effective and make your job easier. See the TIP mentioned earlier to carry out a full ceramic tip check.

Now that we have cleaned and cleared our nozzle and are happy that it is ready to get back to work, we can reassemble it. Carefully place the spindle inside the Mustang Nozzle casing, ensuring it sits flush with the ceramic tip inside the case. As mentioned earlier, the spindle should sit loosely inside the case. When inserting the spindle, hold the casing upside down for easier insertion.
Then, gently screw the base to the casing and give the nozzle a gentle shake. You should hear a rattle as the spindle moves inside the case.
Replace the nozzle in the vice and retighten it with the shifter. Don’t be too aggressive with the tightening, as you don’t want to damage the casing.
TIP: Your nozzle may become damaged or clogged when you first start jetting a blocked drain; if you turn on your jetter close to the blockage or debris in the drain, sand and dirt can blow back into the nozzle opening. To avoid this, it is always advisable to clear a drain section first to allow your nozzle space before encountering the blockage. Alternatively, you can place a small piece of electrical tape over the nozzle opening to protect it from the initial surge; the tape will simply be blown off once you start jetting.

And you’re done! Your Mustang Nozzle will be back to full throttle performance, and your jetting should be much more efficient and effective. If your nozzle has continuing performance issues, please contact The Jetters Edge team, and the experts can assist in diagnosing your issues.
You can view a video rundown of the cleaning process below. Glen will take you through the process step-by-step.